A few years ago, while I was scanning my script in, Boyfriend suggested I use a free program called Scan Tailor to clean up the scanned copies before I put them into a pdf. Scan Tailor specializes in cleaning up scans to make them readable and usable. And I would like provide a step by step guide of how to scan in a script and create a nice, neat, professional looking pdf from it.
Note: I've used Scan Tailor for more than just scripts, it's an excellent all around program, so I suggest checking it out whether you're a stage manager or not.
1. Scan the Script
Most stage managers I know either physically cut up and paste their script to create the type of script they need (such as combining a script or score or such) or some actually type up the entire script. I honestly can't imagine this and you can get programs/drivers that will scan text straight into a document, but in my experience those don't work horribly well. So I just stick with images at first. Images can be cropped and spliced and if there are major script changes, then I will just type up only the script changes. While scanning, if you have an unbound copy of the script, document feeds can be a great time saver. I also tend to try to name the images sequentially, so that they will be in the correct order and you don't have to do any renaming.
2. Download Scan Tailor
You can download the program for free here.
3. Put the Script in Scan Tailor
All you need to do is open Scan Tailor and go File > Create New Project. You will get a box that looks like this:

4. Fix Orientation
You can do this in pretty much any program nowadays, but since you're already putting the script in Scan Tailor, you might as well do it here. Just change the orientation how you want and then press the play button next to Fix Orientation and Scan Tailor will reorient all of your images. Here is a picture of the original page without any changes made to it:

As you can see from my example about, this play came from an actual book (and is not in loose leaf form), so there are two pages per image. Scan Tailor can detect that there are two pages (it did this selection for me automatically) and then you can hit the play button and apply the split all of your script pages. If you do have a loose leaf form of script then you can basically just skip this step. Below is an example:

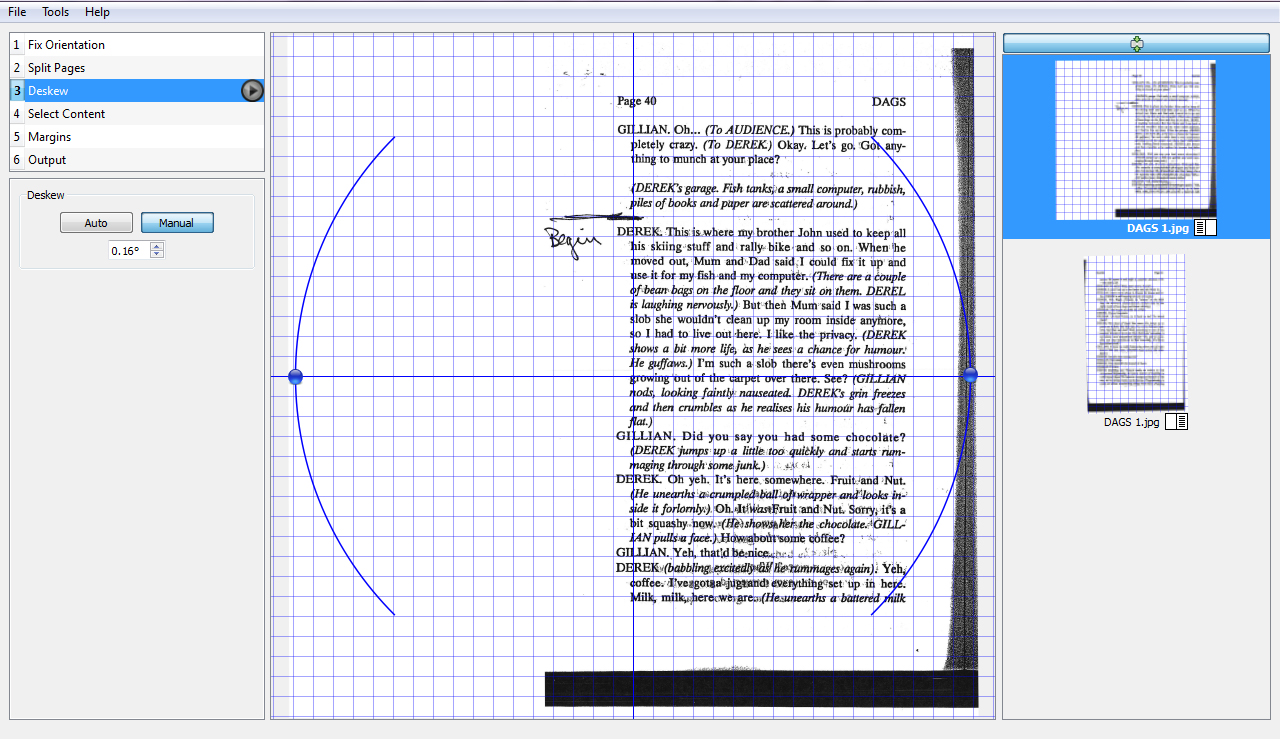
6. Deskew
Unless you are magic (and I certainly am not), it is likely that in your scanning your images got slightly rotated or skewed. Scan Tailor will straighten the images out for you. Like always, you have the option of Scan Tailor doing it automatically or doing it manually. Sometimes Scan Tailor does make mistakes, so I tend to let the program do it automatically and then browse back through for any errors. Press the play button to apply the deskew to all the images.
7. Select Content
Many times when you're scanning you end up with the lovely black boarder around much of your image (pictured above). Select Content allows you to completely get rid of it. Be careful though, like the image below, Scan Tailor frequently does not automatically select page numbers (which you probably need) or headers (which you might not need).

8. Margins
This is really nice, because you can choose the type of margins you want for your image. I tend to like a large right margin and a small left margin when making a calling script. In order to do this, you need to unlikely the right and left margins and then you can change them independently of each other. In the image, you can hopefully see that the left and right margins are not linked by the broken chain next to the left and right boxes.

9. Final Touches
The last step in Scan Tailor is when the image gets really cleaned up. As you can see in the image you have several options in this step. You can change the output resolution (600 tends to be plenty for me, so I don't touch that generally). You can also flip through black and white, greyscale, and color options. One of my favorite features is the thinner/thicker slider. If your text scanned in blocky then you can make it thinner and easier to read (like I did in the example). If your text scanned in faint and thin, then the thicker slider can salvage it. The final option on this screen is to despeckle. This will get rid of dots and artifacts of scanning. In the example I've been using, the scan had managed to pick up some of the text on the other side of the page and despeckling removed a lot of that problem (though not all, it can only do so much with a bad scan). When you are satisfied with your result for your first page, you can press the play button and Scan Tailor will automatically send the files to your output directory (mentioned above) as it completes them.

10. Putting it in a PDF
You can do this with several programs. Once Scan Tailor is done outputting, you can highlight the entire folder and (assuming that your files are named well) it will put the entire script into a word document in order. You may need to adjust the size of the images within Word, which can be a pain (since Word doesn't handle images very quickly). I also tend to minimize my margins in Word as much as possible. This is the step when you can add score in or delete certain parts that were cut from the script. Just be careful with page numbers so that you can always be on the same page as the actors and director.
Boyfriend also suggests using Adobe Acrobat (which I don't actually have) to make images into pdfs. I would give some brief instructions, but since I've never used Acrobat (I should ask Boyfriend to teach me) I can't, so sorry about that.
Why bother with a pdf? Pdf's print much faster than a Word doc full of images and they are easier to scroll through.
~*~*~*~*~*~
On an unrelated note, this post is going to make my post on pronouns (which I also posted today) jump down the page, so if you're interested, I encourage you to go read it.
No comments:
Post a Comment